Hi there, and Welcome to the Forum!


Congratulations on your dream of having a drum room, albeit small!
Unfortunately it is attached to another house,
Ouch. So shared walls and roof, and probably shared slab/foundations, implies flanking. In other words, vibration (and therefore sound) has a mechanical path to get through from your place to theirs. There are ways to deal with that, but you'll need a bit more budget (and care in building) than if it was two separate buildings.
What are the houses made of? What building materials? Also: is the party wall a single solid thing, or is it two walls with a small cavity in between? That's important to know.
To be able to practise during the day without it being too noticeable, sort of background noise
This is probably do-able, but I'd suggest that you first do some testing with a real drum kit, played hard, to find out how much isolation you have at present, and from that figure out how much more you need. This will need the cooperation of your neighbors, as you'll have to take measurements inside their garage while someone plays drums in yours. It's fairly easy to do, ideally with a proper sound level meter (a decent one costs around US$ 100 or so), or worst case, with a good app for your cell phone. The cell phone app won't be accurate, or course (especially in the low frequencies), but it can give you a rough idea of the situation.
Basically, set up a drum kit in your garage as it is right now, get someone to play the same song over and over on it, you measure the level in the room using "C" weighting and "Slow" response on the meter (the level will likely be somewhere around 115 dbC), then close all the doors and windows, go out of the room, and measure the sound level in many locations in and around your house (rooms all over), in the garden (front and back), in the street, and most important, in your neighbor's house. Write down all your measurements. Then do simple math to figure out how much isolation you are getting to each of those locations. That will give you a very good idea of how much you have right now, and how much extra you will need. That, in turn, dictates the materials and methods you will need to isolate.
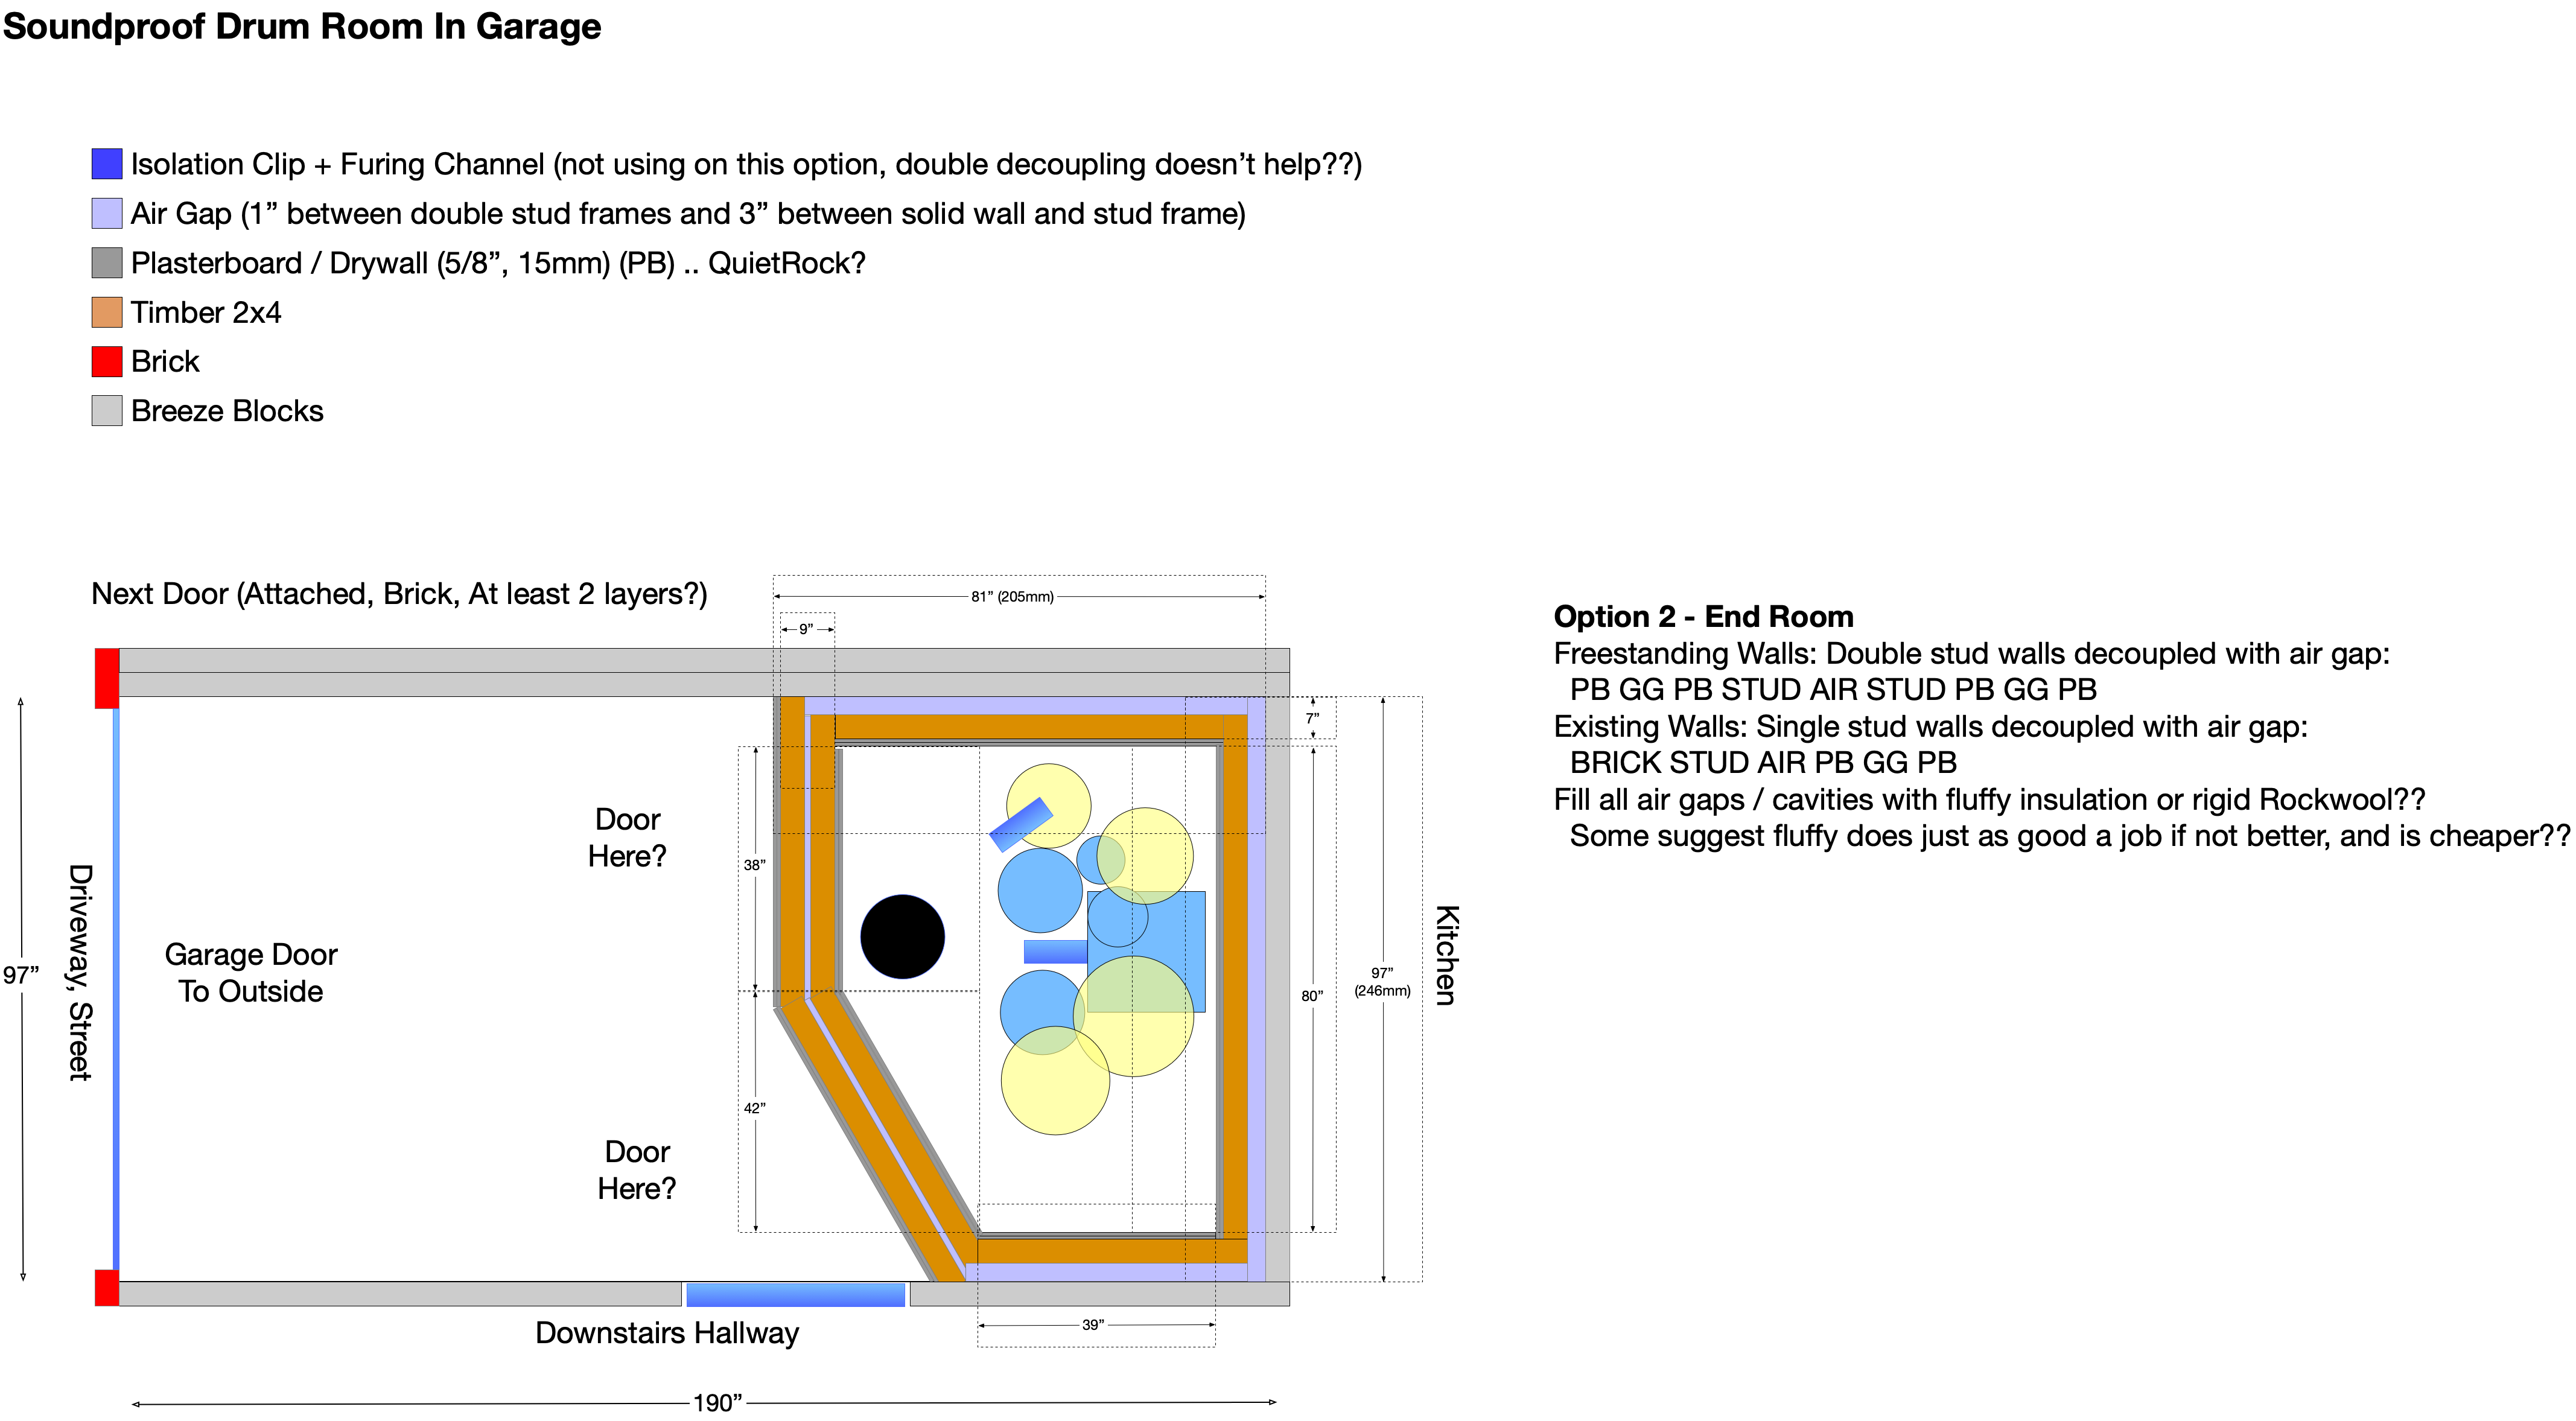
I've linked a diagram with my latest design idea
There's no attachment on your post, so something didn't work there. Try adding it again, to you next post. The Forum accepts most image types (.jpg, .gif, etc.) , as well as most document types (.doc, .pdf, etc.) and also Sketchup and REW files, so it shouldn't be a problem. It also allows fairly large file sizes. If you still can't upload it, then contact me by PM and we'll figure a way that you can send it to me, and I'll "force" load it form behind the scenes.
I then figured I could use the existing walls and ceiling as part of the outer skin of an “outer room” and then build an inner room.
Exactly! For high isolation, that is indeed the way to go.
Here's some articles that you might find interesting:
How much isolation do you need? How to find out.What is "room-in-a-room" construction?What is MSM? How does it work?You will notice in the diagram that there is an angled wall. Unfortunately I can't really see a way around this without partially blocking the hallway entrance door to the garage. Hopefully this wouldn't be too much of a nightmare.
Angles are not usually a problem for isolation or acoustic response. They can even be helpful in some cases. It's a pity I can't see your diagram, though, to get a better idea.
I've read double decoupling doesn't really add enough to be worth it, that's why I didn't bother with isolation clips for this variant of the design.
Right! Double-decoupling doesn't add much at all (if anything), and under some conditions can actually make things worse. Fully decoupling once only is the way to go, and definitely worth it. Partial decoupling probably wouldn't be enough in your case. By "fully decoupled" I mean that there is no physical contact at all between the existing outer-leaf and the new inner-leaf that you will build.
I've read that rigid Rockwool isn't really worth it vs more standard insulation, so maybe standard R13 would be enough?
Rockwool is good stuff, but that's a brand name, not a type of insulation. Generically, it is "mineral wool", and there are other brands of mineral wool besides Rockwool. Likewise, "R13" is a rating, not a specific product, although some manufacturers do just call their products by that name. In any case, what you really need to know is the type of insulation (usually either mineral wool or fiberglass), and the density of the product. That gives you a rough indication of the acoustic properties. In fact, what you really need to know, is something called "Gas Flow Resistivity", or "GFR". That's the actual measure of acosutic impedance, and that tells you exactly what you need to know. However, not all manufacturers test that and publish the numbers, for the simple reason that it doesn't matter for the real purpose of most insulation, which is thermal. GFR doesn't really influence the thermal properties. It's only us studio-building nerds that want the GFR number. Some manufacturers do test and publish the GFR numbers for their products, but many don't. Fortunately, density is a reasonably good indicator of what the GFR would be, if they did test it. There are "rules of thumb" for guesstimating the properties of insulation products based only on density, but it varies by type of insulation, and by manufacturer. So the best thing you can do, is go to your local building materials supplier or hardware store, and see what they have. Note down the manufacturer, the product name, the product type, and the density (kilograms per cubic meter, kg/m3. Or perhaps in pounds per cubic foot, PCF). Based on that, we can probably suggest what your best option would be.
In my case, since I'm also trying to do everything I can to reduce lower frequencies, would using say R45 Rockwool make any appreciable difference? Intuitively it seems like it would, but I’ve read performance is often worse?
Low frequencies are, indeed, the toughest to deal with, both for isolation and also for treatment. But the issue isn't only the insulation: that's just a part of it. Insulation by itself doesn't do much to isolate sound. Insulation is an acoustic damper, not a barrier. It is part of the isolation system. If you look at the article I linked above on MSM, you'll get more info on this, but basically your wall is a resonant system, and you have to build it such that it wont resonate at the frequencies you are trying to isolate. Indeed, the ideal situation is to "tune" your wall so that the natural resonant frequency is at least an octave lower than the lowest frequency you need to isolate. That means: half the frequency. Kick drums usually put out peak energy somewhere around 70-90 Hz (depending on size and tuning), so you'd want a resonant frequency no higher than about 35 Hz. Lower is better. Fortunately, you don't pla ythe 6-string electric bass, which goes down to about 31 Hz, implying a tuning frequency of about 16 Hz! Even worse would be if you wanted to build a home theater and your favorite movies are all about military canons, bombs, or planets colliding. Those frequencies go down into the 'teens, so for that you need to tune your walls, floor, ceiling, doors, windows, and HVAC ducts to way down in the single figures. That is expensive! That's not your situation, though, so you don't need to go to such major extremes as those folks do. In your case, the lowest frequency is going to be the kick, and that's at frequencies where you can do something to help.
Should I get the highest mass 15mm (5/8") I can find?
Basically, yes. But you don't necessarily need to buy the thickest or most expensive. You need mass, yes, but you can build it up in layers. Sometimes two layers of thinner drywall will get you more mass than one layer of thick, and for lower cost. Play around a bit with the numbers, after you check what is available at your supplier. Drywall isn't the only possible material: Anything dense will do the job. Other possibilities are OSB, MDF and fibercement board ("FC"). FC has the advantage of very high density, which is good if you are tight on space as you can use thinner sheets to get the same amount of mass. To give you an idea, here's the density of a few common building materials (rough values!: varies by manufacturer and product):
Plywood... 550 kg/m3
OSB... 600 kg/m3
Drywall ... 680 kg/m3
MDF... 750 kg/m3
FiberCement... 1,500 kg/m3
MLV... 1,800 kg/m3
Brick... 2,100 kg/m3
Glass... 2,500 kg/m3
Steel... 7,800 kg/m3
Lead... 12,000 kg/m3
So if you really want high isolation in a thin package, then lead sheeting is the way to go! A 1 mm thickness of lead sheeting is more mass than a sheet of 16 mm drywall! Of course, there's a slight price difference, too

...
If you need even thinner, and have very, very, VERY deep pockets, then you could go with platinum, which has a density of around 21,500 kg/m3 (nearly double that of lead).
OK, realistically, your options are probably OSB, drywall, MDF and fiber-cement. So look a the cost per kg of those, and see which makes sense for you. Also take into account that drywall is sort of fragile (it cracks easily), FC even more so (brittle), plywood can get damaged by moisture, etc. There are pros and cons...
So, as you can see in the MSM article, the way you tune your wall is with mass and cavity depth. The higher the total mass, the more isolation you get. The greater the cavity depth (between your leaves), the lower the resonant frequency. And the insulation inside the cavity is the "icing on the cake" so to speak: it absorbs the resonance and reverberance going on inside the wall cavity. You need to fill the cavity completely. To give you an idea of how important that is, the difference in isolation between a wall that has zero insulation inside, and one that is completely filled, is at least 10 dB, likely 15 db, and possibly as much as 20 db. That's HUGE! Correctly filling your cavity with the right insulation is the single biggest thing you can do to increase isolation, in terms of cost/benefit and overall improvement.
The other thing you need, is hermetic seals. Both of your leaves need to be sealed air-tight in order for the MSM magic to do it's things. If your walls and ceiling are not completely sealed, then you lose a LOT of isolation.
So, the plan here is to figure out the combination of how much mass you need and what cavity depth you need to get your resonant frequency right, and your isolation right. There are equations for that in the articles above, but there are also tables, documents, guidelines, and rules of thumb that you can use to estimate. Check out the "resources" section of the forum.
I've been warned against buying things with the word "acoustic" in the title because the price tends to be inflated.
Good advice! Some manufacturers really do inflate their prices for "acosutic" products. All you really need is the right mass on each leaf, the right cavity depth, and the right GFR for your isolation. The rest is all marketing hype.
Does the mass matter more than the material?
Mass is mass. Sound waves don't care at all how much you paid per kilogram! They can't read price tags, and all they care about is how much mass they run into, and what the GFR is of the insulation. In other words, use the cheapest material that will do the job you need, while also taking into account the other factors. If space is at a premium and you can afford to pay a little more, then maybe a thinner but higher-density material will do the trick better. On the other hand, if you have never worked with fiber-cement board before, there's a risk you could damage it with careless workmanship (eg, hammering the nails a bit too hard). Drywall is fairly easy to work with, as long as you take reasonable care, and usually is the cheapest mass in most places around the world. But it's worth checking into alternatives.
I’ve also heard good things about “QuietRock” sheets as an alternative, but more expensive, and probably even heavier.
"heavier" isn't really the factor you are after. It's "cost per kg". If all you want is "heavy", then go for lead sheeting! But the cost is way, way up there. What matters is how much mass you have on each leaf. By that, I mean "surface mass" or "surface density" (in kilograms per square meter, kg/m2, or pounds per square foot, psf). In other words, if you were to cut out one square meter of your finished wall and weight it, how heavy would it be? That's what matters. Choose whatever combination of materials you can get to achieve the highest mass at the lowest cost, while also considering the other factors. And don't forget that you can build up your total mass, in layers, one directly on top of the other (no air spaces between, but also not glued together). I always recommend starting with a layer of OSB on the studs, as that gives you good, tough base layer that you can nail into anyplace, is dense, flexible, and provides very good structural integrity in the sheer plane. Then add layers of drywall on top of that, as needed to get to the mass you want. You can also use a very neat product called "GreenGlue" in between those layers, to greatly increase isolation. Despite the name, GreenGlue is not glue at all! It is not an adhesive for attaching the layers to each other. Rather, it is a specially formulated visco-elastic polymer that keeps the layers slightly apart, and damps them. Of course, GreenGlue is expensive, so it might be out of your price range, if you are on a tight budget. But it does work, and there really aren't any viable alternatives to it (beware of imitations!).
Here is the diagram - I’m looking to improve it and make a 3D version
Try "SketchUp". It's what I use for designing the studios for all my clients. It's a bit quirky and takes some getting used to, but once you get the hang of it is pretty good.
I have had one person say it is impossible not to be a nuisance with drums on an attached properly, but I’m more optimistic based on some YouTube videos I’ve seen.
Not impossible at all! Just not so easy, and not so cheap. The main thing is to identify how much isolation you have right now, and how much you need to achieve to keep your neighbors happy. It can be done. With careful design, a good budget, and good attention to detail in the construction, you can very likely get to decent results.
- Stuart -
(PS. Just wondering why your profile flag is for Italy, but your IP address is in the UK? That's usually an indication of a spammer, but clearly you aren't one(!). Maybe you could fix that, in your profile? Select the flag for "Great Britain", and you'll be OK. I don't want the automatic security software to pick up on that discrepancy, and mark you as spam!)


