Studio Build: Garage Conversion in Los Angeles
Posted: Sun, 2020-Aug-16, 01:38
DISCLAIMER: some of the pictures have imported sideways. I apologize for this, but I don't know how to fix it. Just turn your head to the right to get a better look. 
I started a thread in the design section of this forum to ask about a specific HVAC design, but I think it makes more sense to start a complete progress thread to be more clear, and keep everything in one place. Below is yet another garage conversion story.
The Plan:
My wife and I bought our first house (finally), and I am excited to finally be able to build a rehearsal/recording studio in the garage. My goal is to convert the garage to a rehearsal space that contain my drums. I am doing a full "room in a room" design. I am in 4 bands at the moment, so I have a lot of practicing to do, and it'd be nice to be able to practice without worrying about my neighbors hating me. I have been known to practice for 8-10 hours a day, so simply asking my neighbors to tolerate the noise is not fair to them. Being able to track drums in there is a close 2nd in terms of priority. I will also likely be having full band rehearsals a couple of times a month.
I'd say:
80% of the time it's just me in the room practicing.
10% of the time I'll be tracking drums
10% of the time I'll have full band rehearsals.
I figure it will take me a year to complete the project, including research, planning, design, construction, and room treatment. I have been researching and planning for about 5-6 months already, and have started construction 3 about months ago. I am doing the majority of the work myself, so it has been extremely slow going, but that was to be expected. I am working with a structural engineer because of the roof issues i'll explain later in the post, and I will be consulting with an electrician when it comes time to do the electrical (my plans for that will be detailed below as well). I may hire a contractor to help with things I'm concerned about, but I'm really trying to keep this as DIY as possible to keep the costs down.
Budget:
I originally thought I could do this for $10,000, but after doing some initial research and material sourcing, I was looking at a materials cost of around $20,000+. Then I started to learn more about what REALLY works in sound isolation (thanks to forums like this, and Rod's book). I learned that using the right materials IN THE RIGHT PLACE makes more of a difference than MORE materials, or expensive materials that are marketed as "sound proofing" materials. I am now working with a materials budget of $15,000 and so far that's looking pretty good. I'm keeping track of every penny spent, and so far I'm on schedule. I am not including room treatment in this budget, just isolation materials. I will re-evaluate budget when I get ready to treat the room.
Isolation Needs
I had a friend walk around the property with a spl meter while I played at full volume on the drums. I had him take measurements at key points around the property. My biggest concern is my neighbor to the west. His house is about 30 feet from my garage, and i was getting levels of about 81dbC on that side of the garage, and 93dbC in front of the garage where his house is closest to. I am aware that with my budget and construction methods, the absolute MAXIMUM I could achieve would be about 70db of TL... and that's if everything is done perfectly with no mistakes. Realistically I know to expect probably 50db of TL, and if I got that, I'd be OK with it. My budget isn't very big, so planning and making sure I do this right the first time is a priority.
Garage Specs
The garage is on the smaller side. It was built in 1936. It is unfinished which is nice because that's less work to take down any drywall or plywood on the interior and I can get right to beefing up the exterior leaf. The exterior is stucco (approx 1 inch thick), and the roof is 7/16" OSB roof sheathing with roof shingles on top. The studs and rafters are 2x4 (1 7/8 x 3 5/8), and the garage door is metal.
The inside measures from stud face to stud face
17' 7 1/2" x 15' 4" x 8' 1" high (to the top of the top plate).
The peak of the roof is 11' 4", and is a 4/12 roof pitch. There is a ridge board (not ridge beam) that measures 5 1/2" by 3/4".
The floor is concrete slab on grade, and in fantastic condition considering how old it is. I took a 4ft level and placed it all over the floor in every possible direction, and it's level with no dips or bumps. there are some small hair line fractures, and a some very small chips here and there, but nothing to be concerned with.
Here is a sketchup of the exterior frame.
There were 2 horizontal rafter ties, and 2 diagonal rafter ties.
One of the reasons I hired a structural engineer, was I wanted to remove these rafter ties so that I could raise the ceiling of the inner "room" as high as I could. So I needed help with making sure the walls wouldn't lean and the roof collapse. Apparently that's not good.
I have removed those ties, and have installed massive gussets with new 2x6 rafter ties higher up on the rafters to raise the effective ceiling height of the finished room. I didn't end up with as much ceiling height as I originally wanted, but I definitely got more than I would have.
Design Plan for Garage:
I will be building a single room, no booths, no separate mixing station. I do most of my recording by myself, so I don't need a separate space for that.
Exterior wall will look like this:
Stucco > 3/4" OSB > 5/8" drywall (backer rod and caulked around all drywall pieces)
pink fluffy inside stud bays as well as cavity
Interior Frame (walls and ceiling):
2x6 frame stuffed with pink fluffy
3/4" OSB > Green Glue > 5/8" Drywall > Green Glue > 5/8" Drywall
The perimeter of all drywall will be spaced 1/4", and 3/8" backer rod will be stuffed around and caulked. I will be using the staggered drywall installation method I have seen in Rod's book and all over this forum. Ceiling first, North/South walls 2nd, East/West walls 3rd, allowing space for backer rod and caulk around the perimeter.
First step is to beef up the existing outer leaf. This took the most amount of time. It was extremely tedious to cut the OSB and drywall into the proper sizes and shapes because of the diagonal bracing of the existing frame. Cutting the cleats to those exact angles was a pain in the ass, but it looks great, and feels super solid.
- I have already installed strips of 3/4" OSB into the stud bays, and secured them in place with wood cleats. I have caulked the edges.
(sideways)
(sideways)
Next up was cutting the drywall and fitting it into place. Again, very tedious, but I'm happy with the way it turned out. I left a gap of about 3/8" around the drywall pieces at first, then stuffed it with 1/2" backer rod and caulked. I have decided that 3/8" is too big, because there were a lot of uneven studs and it caused much bigger gaps. So after the first 6 bays, I switched to 1/4" gaps and 3/8" backer rod, using 1/2" in areas that had slightly larger gaps... and this was MUCH better.
(sideways)
The under side of the roof has slats from north to south just above the rafters. The sheathing is then nailed to these slats. This made things slightly more complicated in that if I was to add layers of mass directly under the slats, there would be hundreds of 1" air gaps between the added mass, and the OSB roof sheathing.
(sideways)
So I added 1" EPS foam in between each slat. Again, INSANELY tedious because no two gaps were the same size, but it allowed me to add a layer of mass directly to the underside of the roof sheathing with no gaps, making sure the outer leaf was one continuous leaf.
(sideways)
Next up was building and installing the massive gussets. The reason they are so big, is not only to stop the walls from pushing out (and causing the roof to collapse), but also to support the added weight of all the mass I was installing for the "beef up". The structural engineer I was working with was very difficult, as it seemed he had never done anything like this before, so it was a real struggle to get him to understand what I was doing. In the end, I'm OK with how it turned out. here is the design we ended up with, after weeks of back and forth emails and design tweaking. I had to special order these "skewed angle brackets" from Simpson Strong Tie, and use massive 5/8" thru bolts to secure install it all together.
Finally, here is the result of them installed.
(sideways)
(sideways)
At this point, all 3 walls, including the gable end above the garage door and the ceiling are "beefed up". I am sealing up the garage door as we speak. next up is building the interior frame.
I found a new structural engineer who gave me some tips on making a solid interior frame. I did the design, he just tweaked it and made sure I was adding the right supports in the right places. He was a PLEASURE to work with, and I wish I had found him in the beginning. I would have saved thousands of dollars. But we live and learn.
I'll post my progress on the frame build as it happens (hopefully in the next week or so). I will be flying to Tahiti and Bora Bora for a much needed vacation with my wife in a few weeks, so having the frame done before I leave would be lovely.
Electircal:
To achieve maximum isolation, I plan on having the sub panel, and all outlets face mounted onto the drywall so there is just 1 hole in the wall where the power is being brought into the room. I will be using metal conduit and metal boxes so I can run a STAR grounding system with isolated receptacles for all studio/music gear. There is currently a 40 amp sub panel, but I am going upgrade that to a 60 amp sub panel. I will have more questions about this when I get closer, but I have a good foundation of how this will go.
HVAC
As I get closer to building the interior frame, it is becoming increasingly imperative that I figure out the HVAC for the room. I posted a lot of this in the other thread, so bare with me if you've already read it.
Estimated dimensions of finished interior room:
15' 3" x 14' 3" x 8' 6"
(approx 1800 cubic feet)
With an ideal 6 room changes per hour, that's approximately 10,700 cubic feet per hour. Most everything is categorized in cubic feet per MINUTE (not hour), so divide by 60 and you get...
10,700/60 = ~178 CFM
The Ductless Mini-Split I will be using has these specs:
High speed - 294 CFM
Medium speed - 212 CFM
Low Speed - 147 CFM
So the split system will be able to heat/cool the room adequately.
To make sure I'm getting enough fresh air into the room, I need 1/4 to 1/2 of the room circulation rate, right? 40% is a good number to use to estimate.
So 178 x 40% = ~71 CFM
The HRV unit I have been looking at has these specs:
High speed - 71 CFM
Medium speed - 53 CFM
Low speed - 35 CFM.
So I think that unit will provide the air circulation that I need.
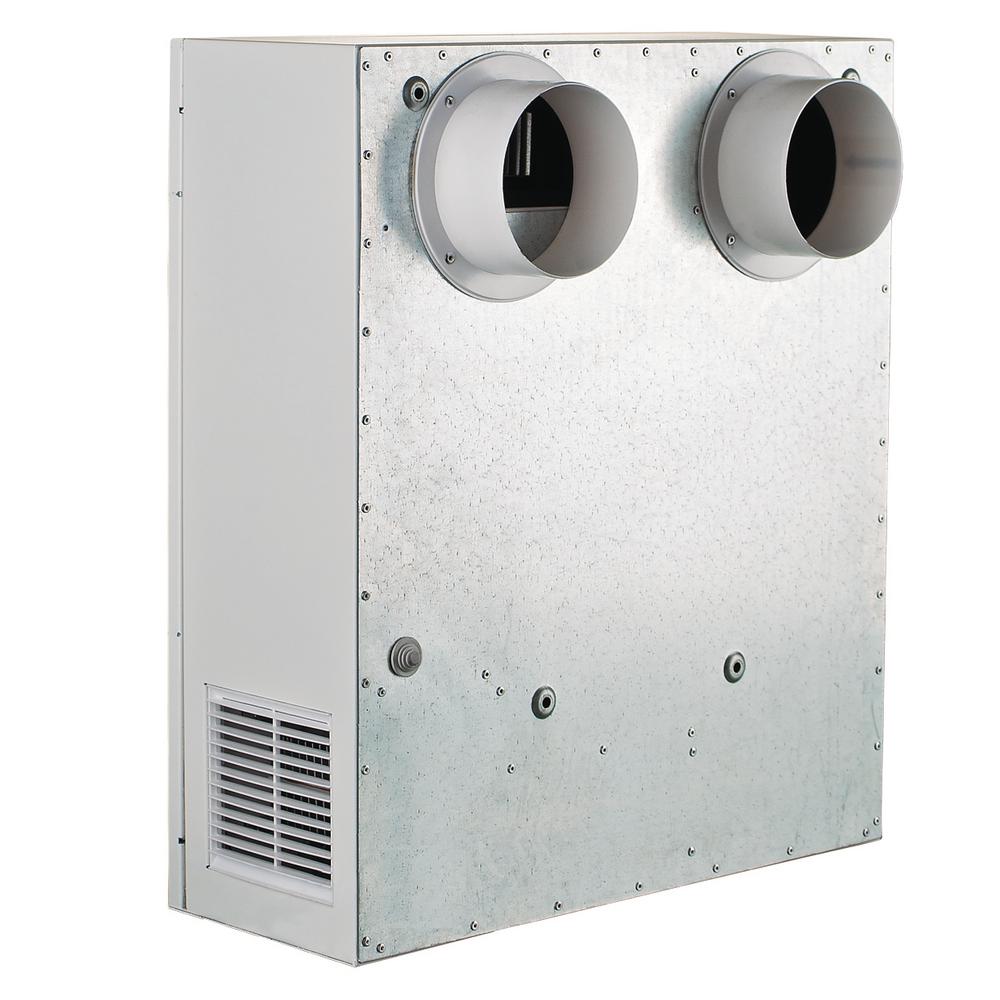
Here's the situation I'm in. THIS HRV UNIT is designed to installed INSIDE the room.
The incoming air and exhaust vents are on the unit itself. It has two 5" ducts on the back that are supposed to go straight through the wall (using duct extenders) and brought straight outside. Obviously this will not work for sound isolation.
I will be putting the two baffle boxes inside the room. I am aware that they can be quite huge, but that's OK. It's my only option, and well, that's how it goes. I plan on making them pretty beefy too, 3/4" OSB, and 2 layers of drywall (same as my inner walls).
I have 3 goals.
1) Make sure I'm getting fresh air in the room, and stale air is being brought out.
2) Make sure the air is conditioned properly.
3) make sure my drumming does not get out of the building through the ducts.
I DO NOT care about the HRV/Mini-Split system noises inside the room. Like I stated earlier, 80% of the time it is just going to be me in the room practicing and about 10% tracking drums. When I am recording, it is most likely going to be just me, so if I need to turn down or turn off the systems to eliminate the noise for 5-10 minutes at a time, I'm perfectly fine doing this. And in all likelihood, the noise won't be enough to bother me during recording anyway.
here is a sketchup of my idea. It is a VERY rough sketch, but just enough to give you an idea. The HRV will be on the wall to the left of the mini-split. The fresh air vent on the HRV is on the right side, so that air will hit the mini-split immediately after leaving the vent. Both ducts will go down and enter the baffle boxes. The boxes will hit the south wall and the air will be brought outside via ducts inside the south wall.
I need help with building the right size silencer boxes, and figuring out how big my ducts need to be inside the wall carrying the air to/from the outsize via the exterior leaf. The longer the duct run, the less efficient the HRV unit will operate.
I have not purchased the HRV unit yet, so if I need to go another route I will. Also, I can NOT put any HRV or ERV outside of the room. There is simply no place for me to put it. I am out of space, lol.
If any of you are still alive after reading this, I commend you. And also, I'm sorry. haha. But if you have any advice, please, I'm all ears!
I started a thread in the design section of this forum to ask about a specific HVAC design, but I think it makes more sense to start a complete progress thread to be more clear, and keep everything in one place. Below is yet another garage conversion story.
The Plan:
My wife and I bought our first house (finally), and I am excited to finally be able to build a rehearsal/recording studio in the garage. My goal is to convert the garage to a rehearsal space that contain my drums. I am doing a full "room in a room" design. I am in 4 bands at the moment, so I have a lot of practicing to do, and it'd be nice to be able to practice without worrying about my neighbors hating me. I have been known to practice for 8-10 hours a day, so simply asking my neighbors to tolerate the noise is not fair to them. Being able to track drums in there is a close 2nd in terms of priority. I will also likely be having full band rehearsals a couple of times a month.
I'd say:
80% of the time it's just me in the room practicing.
10% of the time I'll be tracking drums
10% of the time I'll have full band rehearsals.
I figure it will take me a year to complete the project, including research, planning, design, construction, and room treatment. I have been researching and planning for about 5-6 months already, and have started construction 3 about months ago. I am doing the majority of the work myself, so it has been extremely slow going, but that was to be expected. I am working with a structural engineer because of the roof issues i'll explain later in the post, and I will be consulting with an electrician when it comes time to do the electrical (my plans for that will be detailed below as well). I may hire a contractor to help with things I'm concerned about, but I'm really trying to keep this as DIY as possible to keep the costs down.
Budget:
I originally thought I could do this for $10,000, but after doing some initial research and material sourcing, I was looking at a materials cost of around $20,000+. Then I started to learn more about what REALLY works in sound isolation (thanks to forums like this, and Rod's book). I learned that using the right materials IN THE RIGHT PLACE makes more of a difference than MORE materials, or expensive materials that are marketed as "sound proofing" materials. I am now working with a materials budget of $15,000 and so far that's looking pretty good. I'm keeping track of every penny spent, and so far I'm on schedule. I am not including room treatment in this budget, just isolation materials. I will re-evaluate budget when I get ready to treat the room.
Isolation Needs
I had a friend walk around the property with a spl meter while I played at full volume on the drums. I had him take measurements at key points around the property. My biggest concern is my neighbor to the west. His house is about 30 feet from my garage, and i was getting levels of about 81dbC on that side of the garage, and 93dbC in front of the garage where his house is closest to. I am aware that with my budget and construction methods, the absolute MAXIMUM I could achieve would be about 70db of TL... and that's if everything is done perfectly with no mistakes. Realistically I know to expect probably 50db of TL, and if I got that, I'd be OK with it. My budget isn't very big, so planning and making sure I do this right the first time is a priority.
Garage Specs
The garage is on the smaller side. It was built in 1936. It is unfinished which is nice because that's less work to take down any drywall or plywood on the interior and I can get right to beefing up the exterior leaf. The exterior is stucco (approx 1 inch thick), and the roof is 7/16" OSB roof sheathing with roof shingles on top. The studs and rafters are 2x4 (1 7/8 x 3 5/8), and the garage door is metal.
The inside measures from stud face to stud face
17' 7 1/2" x 15' 4" x 8' 1" high (to the top of the top plate).
The peak of the roof is 11' 4", and is a 4/12 roof pitch. There is a ridge board (not ridge beam) that measures 5 1/2" by 3/4".
The floor is concrete slab on grade, and in fantastic condition considering how old it is. I took a 4ft level and placed it all over the floor in every possible direction, and it's level with no dips or bumps. there are some small hair line fractures, and a some very small chips here and there, but nothing to be concerned with.
Here is a sketchup of the exterior frame.
There were 2 horizontal rafter ties, and 2 diagonal rafter ties.
One of the reasons I hired a structural engineer, was I wanted to remove these rafter ties so that I could raise the ceiling of the inner "room" as high as I could. So I needed help with making sure the walls wouldn't lean and the roof collapse. Apparently that's not good.
I have removed those ties, and have installed massive gussets with new 2x6 rafter ties higher up on the rafters to raise the effective ceiling height of the finished room. I didn't end up with as much ceiling height as I originally wanted, but I definitely got more than I would have.
Design Plan for Garage:
I will be building a single room, no booths, no separate mixing station. I do most of my recording by myself, so I don't need a separate space for that.
Exterior wall will look like this:
Stucco > 3/4" OSB > 5/8" drywall (backer rod and caulked around all drywall pieces)
pink fluffy inside stud bays as well as cavity
Interior Frame (walls and ceiling):
2x6 frame stuffed with pink fluffy
3/4" OSB > Green Glue > 5/8" Drywall > Green Glue > 5/8" Drywall
The perimeter of all drywall will be spaced 1/4", and 3/8" backer rod will be stuffed around and caulked. I will be using the staggered drywall installation method I have seen in Rod's book and all over this forum. Ceiling first, North/South walls 2nd, East/West walls 3rd, allowing space for backer rod and caulk around the perimeter.
First step is to beef up the existing outer leaf. This took the most amount of time. It was extremely tedious to cut the OSB and drywall into the proper sizes and shapes because of the diagonal bracing of the existing frame. Cutting the cleats to those exact angles was a pain in the ass, but it looks great, and feels super solid.
- I have already installed strips of 3/4" OSB into the stud bays, and secured them in place with wood cleats. I have caulked the edges.
(sideways)
(sideways)
Next up was cutting the drywall and fitting it into place. Again, very tedious, but I'm happy with the way it turned out. I left a gap of about 3/8" around the drywall pieces at first, then stuffed it with 1/2" backer rod and caulked. I have decided that 3/8" is too big, because there were a lot of uneven studs and it caused much bigger gaps. So after the first 6 bays, I switched to 1/4" gaps and 3/8" backer rod, using 1/2" in areas that had slightly larger gaps... and this was MUCH better.
(sideways)
The under side of the roof has slats from north to south just above the rafters. The sheathing is then nailed to these slats. This made things slightly more complicated in that if I was to add layers of mass directly under the slats, there would be hundreds of 1" air gaps between the added mass, and the OSB roof sheathing.
(sideways)
So I added 1" EPS foam in between each slat. Again, INSANELY tedious because no two gaps were the same size, but it allowed me to add a layer of mass directly to the underside of the roof sheathing with no gaps, making sure the outer leaf was one continuous leaf.
(sideways)
Next up was building and installing the massive gussets. The reason they are so big, is not only to stop the walls from pushing out (and causing the roof to collapse), but also to support the added weight of all the mass I was installing for the "beef up". The structural engineer I was working with was very difficult, as it seemed he had never done anything like this before, so it was a real struggle to get him to understand what I was doing. In the end, I'm OK with how it turned out. here is the design we ended up with, after weeks of back and forth emails and design tweaking. I had to special order these "skewed angle brackets" from Simpson Strong Tie, and use massive 5/8" thru bolts to secure install it all together.
Finally, here is the result of them installed.
(sideways)
(sideways)
At this point, all 3 walls, including the gable end above the garage door and the ceiling are "beefed up". I am sealing up the garage door as we speak. next up is building the interior frame.
I found a new structural engineer who gave me some tips on making a solid interior frame. I did the design, he just tweaked it and made sure I was adding the right supports in the right places. He was a PLEASURE to work with, and I wish I had found him in the beginning. I would have saved thousands of dollars. But we live and learn.
I'll post my progress on the frame build as it happens (hopefully in the next week or so). I will be flying to Tahiti and Bora Bora for a much needed vacation with my wife in a few weeks, so having the frame done before I leave would be lovely.
Electircal:
To achieve maximum isolation, I plan on having the sub panel, and all outlets face mounted onto the drywall so there is just 1 hole in the wall where the power is being brought into the room. I will be using metal conduit and metal boxes so I can run a STAR grounding system with isolated receptacles for all studio/music gear. There is currently a 40 amp sub panel, but I am going upgrade that to a 60 amp sub panel. I will have more questions about this when I get closer, but I have a good foundation of how this will go.
HVAC
As I get closer to building the interior frame, it is becoming increasingly imperative that I figure out the HVAC for the room. I posted a lot of this in the other thread, so bare with me if you've already read it.
Estimated dimensions of finished interior room:
15' 3" x 14' 3" x 8' 6"
(approx 1800 cubic feet)
With an ideal 6 room changes per hour, that's approximately 10,700 cubic feet per hour. Most everything is categorized in cubic feet per MINUTE (not hour), so divide by 60 and you get...
10,700/60 = ~178 CFM
The Ductless Mini-Split I will be using has these specs:
High speed - 294 CFM
Medium speed - 212 CFM
Low Speed - 147 CFM
So the split system will be able to heat/cool the room adequately.
To make sure I'm getting enough fresh air into the room, I need 1/4 to 1/2 of the room circulation rate, right? 40% is a good number to use to estimate.
So 178 x 40% = ~71 CFM
The HRV unit I have been looking at has these specs:
High speed - 71 CFM
Medium speed - 53 CFM
Low speed - 35 CFM.
So I think that unit will provide the air circulation that I need.
Here's the situation I'm in. THIS HRV UNIT is designed to installed INSIDE the room.
The incoming air and exhaust vents are on the unit itself. It has two 5" ducts on the back that are supposed to go straight through the wall (using duct extenders) and brought straight outside. Obviously this will not work for sound isolation.
I will be putting the two baffle boxes inside the room. I am aware that they can be quite huge, but that's OK. It's my only option, and well, that's how it goes. I plan on making them pretty beefy too, 3/4" OSB, and 2 layers of drywall (same as my inner walls).
I have 3 goals.
1) Make sure I'm getting fresh air in the room, and stale air is being brought out.
2) Make sure the air is conditioned properly.
3) make sure my drumming does not get out of the building through the ducts.
I DO NOT care about the HRV/Mini-Split system noises inside the room. Like I stated earlier, 80% of the time it is just going to be me in the room practicing and about 10% tracking drums. When I am recording, it is most likely going to be just me, so if I need to turn down or turn off the systems to eliminate the noise for 5-10 minutes at a time, I'm perfectly fine doing this. And in all likelihood, the noise won't be enough to bother me during recording anyway.
here is a sketchup of my idea. It is a VERY rough sketch, but just enough to give you an idea. The HRV will be on the wall to the left of the mini-split. The fresh air vent on the HRV is on the right side, so that air will hit the mini-split immediately after leaving the vent. Both ducts will go down and enter the baffle boxes. The boxes will hit the south wall and the air will be brought outside via ducts inside the south wall.
I need help with building the right size silencer boxes, and figuring out how big my ducts need to be inside the wall carrying the air to/from the outsize via the exterior leaf. The longer the duct run, the less efficient the HRV unit will operate.
I have not purchased the HRV unit yet, so if I need to go another route I will. Also, I can NOT put any HRV or ERV outside of the room. There is simply no place for me to put it. I am out of space, lol.
If any of you are still alive after reading this, I commend you. And also, I'm sorry. haha. But if you have any advice, please, I'm all ears!
 Fantastic!
  or a bunch of old leaves sucked way down the intake duct, to some inaccessible spot.